![sonicwall.jpg]](https://kb.mspcentric.io/hs-fs/hubfs/sonicwall.jpg?height=36&name=sonicwall.jpg)
Integration Permissions
On-premise minimum requirements.
-
Fully Chained SSL Certificate
-
The latest stable version of ConnectWise PSA
-
If your ConnectWise PSA instance restricts access based on IP, you will need to reach out to support to get the latest IP's.
Security Role Update
To begin, we must ensure that our security role is updated to match the required permissions for our system to interact correctly with the ConnectWise
Login to ConnectWise Manage
Navigate to System > Security Roles.
Create a new Security Role with the following permissions:
-
Expand Companies and grant Inquire to Company Maintenance

-
Expand Finance and grant Inquire to Agreement Sales

-
Within Finance, grant Add, Edit, and Inquire to Agreements.

-
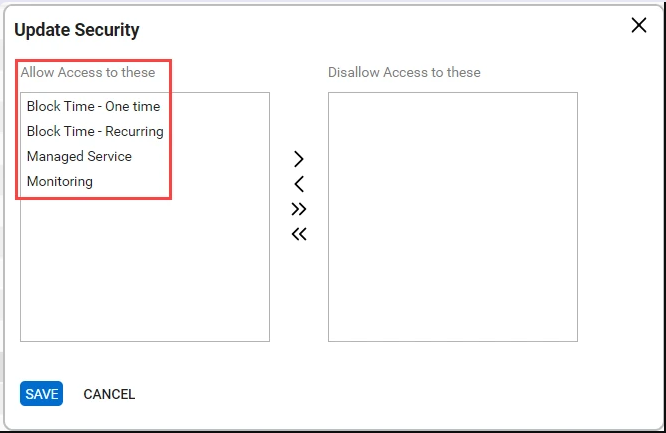
Select Customize for Agreements, and ensure any contract types that you wish to have synced into the tool are moved over to the left side(Allow). By default, we suggest all types to be set this way, but you can limit what gets synced over by leaving them on the right side if you wish.
-
Expand Procurement and grant Edit and Inquire to Product Catalog and Products.

-
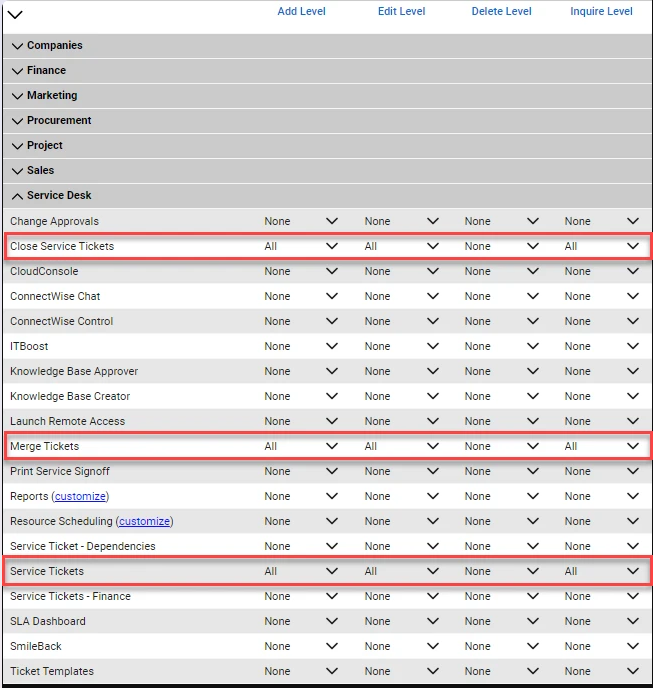
Expand Service Desk and grant Add, Edit, and Inquire to Close Service Tickets, Merge Tickets, and Service Tickets.
-
Expand System and Grant Add, and Inquire to Table Setup.

-
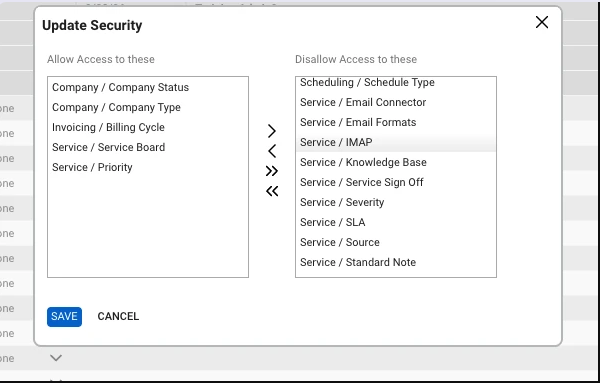
Select Customize for Table Setup and ensure "Company / Company Status", "Company / Company Type", "Invoicing / Billing Cycle", "Service / Service Board", and “Service / Priority” is set to Allow(left side box).
- Make sure to save your settings, then navigate to System > Members > API Members tab, create a new API member and assign the newly created Security Role, then save the member.
- Navigate to the API Keys tab. Create a new API Key and add a description.
- Click Save, and keep a record of the Public and Private Keys.
- Keep a record of the Company ID, URL (https://example.connectwise.com), and both the Public and Private API Keys ready for the next step.
- Input your Public Key, Company ID, Private Key, and URL.
- Click Save and Test.
Congratulations, you've successfully connected your PSA!
Ensure that you save before leaving the Security Roles page, and if you have no assigned this Security Role to an API Member user, please do so.
Do you need to limit the agreement types you sync? You can do this via the security role by adding or removing them.
If you remove agreement types that were previously synced, you may need to reach out to support to have your account cleared and a fresh sync.